Stop Annoying Balloon Messages

Those system notification balloon messages that Windows pops up are meant to be less distracting than traditional message boxes, but they can be really annoying at times.

How about “This USB device can perform faster”  ? Well if the device in question is just being hooked up temporarily to transfer a few files, you probably don’t care that it may not be operating at full speed. But I bet you wish Windows would shut up about it!

Or “Windows has blocked some startup programs”, right after you’ve intentionally used MSConfig to troubleshoot some programs that load at startup. You know perfectly well what you’ve done, you don’t need Windows to keep telling you about it.

In the same vein are all those security center warnings that state the obvious. Turn off the firewall or disable the antivirus to see if it’s interfering with something else on your PC and you get harrassed by balloon messages until you eventually relent and turn it back on.

Balloon Annoyances

A quick search will give you some methods for getting rid of these messages, but in most cases they’re seriously flawed. Take the USB optimization message for example. On pre-Windows 7 systems you can bring up the properties on the USB controller and tick the box marked “Don’t tell me about USB errors”. That certainly stops the optimization message, but it also stops a whole host of other USB messages that you might need if a USB device is genuinely having problems. There are also registry hacks that get rid of particular classes of balloon messages, but again that’s using a sledgehammer to crack a nut, especially if it’s only a specific couple of messages that bug you.

PTFB Pro offers a much cleaner, more appropriate solution. You can target the specific balloon messages that irk you, and let PTFB Pro close them so quickly they’ll never get a chance to bug you again. Here’s how to go about it:

  • When the offending balloon message next appears, open up PTFB Pro’s main screen, hit “Single Press” and click anywhere on the balloon.

One step – that’s all there is to it. Optionally you could edit the new item and tweak a couple of settings. For example you could give it a more meaningful name, or head to the Triggers page and either zero the initial delay (to blow the balloon away the instant it appears) or set a short delay so that message still shows but only for a very short time. The  best thing is it’s trivial to reverse the suppression of the message; all you have to do is untick the associated item in PTFB Pro:

Toggling single press

Find out more about boosting your productivity with autoclicks and macros.
CLICK HERE to download a free 30 day trial, no strings attached. If you aren’t entirely happy simply uninstall!

Case Study – bridging the gaps in other automation software

The following is an excerpt from a customer email, and describes how PTFB Pro is used within his company to assist in automation of their accounting system.

“We use PTFB for a couple of application servers we have.  One is for the accounting system.  There are some batch jobs that are supposed to be run nightly.  The system has some half backed automation software that performs 98% of the job.  However without the remaining 2% it is not automated.  PTFB was able to take care of the remaining 2%.

We have a separate application box that runs a process control application. Once complete it dispatches the work order.  One of the process control steps requires a third party application to open and close to process a portion.  We launch the application and PTFB takes over to complete the task and close the application so this process can also be automated.

The extra couple of licenses help us during migrations between version of the systems. For the most part once we can get past the week or two of setup it runs reliable, with the couple of minor exceptions during the year where something prevented the application running in a timely manner.  A remote reboot is all that is needed to restart the process.”

Find out more about automating your workflow with Macros.
CLICK HERE to download a free 30 day trial, no strings attached. If you aren’t entirely happy simply uninstall!

Find out more about boosting your productivity with autoclicks and macros.
CLICK HERE to download a free 30 day trial, no strings attached. If you aren’t entirely happy simply uninstall!
People keep closing a vital program on our shared office PC. How can I restart it automatically?

There can be lots of reasons why programs close even though you need them to keep running. If they’re buggy, then it could be because they’ve crashed, but in an office situation it could simply be that some other employee has mistakenly closed the program. In these cases it’s tempting to lock the PC in question, but that might not be an option if the PC is shared and open for use by general office staff.

One way round the problem is to use a Program Monitor (“ProgMon”) macro in PTFB Pro. Just follow these steps:

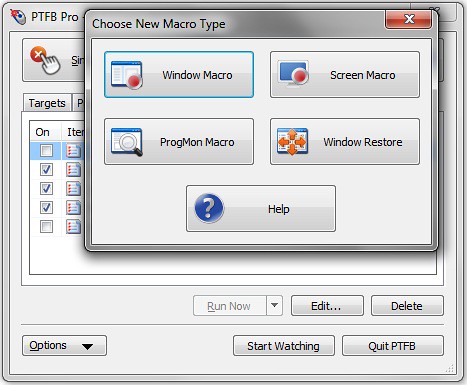
1) Open up PTFB Pro’s main screen, hit “New Macro” and choose “ProgMon Macro”

PTFB Choose Macro

2) Select your vital program in the list on the first wizard page, and hit Next

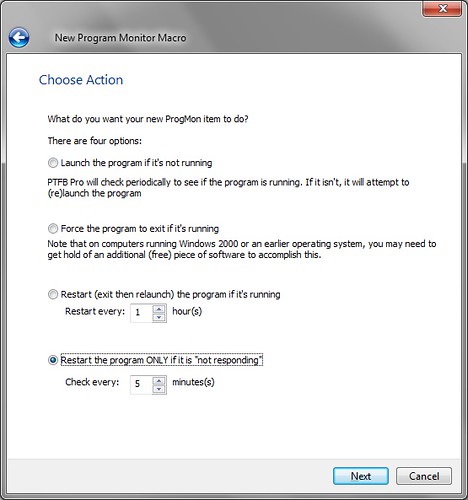
3) On the next page, select the action “Launch the program if it’s not running” and hit Next

Progmon action page

4) On the final page, you can enter the command line required to launch your program. PTFB Pro will typically provide a base command line but you can add parameters if needed, or even set the program to run under a specific account. Hit Finish when you’re done, then “Start Watching” to put PTFB Pro into action.

From now on, any time PTFB Pro discovers that the program in question has closed it’ll relaunch it automatically!

Find out more about boosting your productivity with autoclicks and macros.
CLICK HERE to download a free 30 day trial, no strings attached. If you aren’t entirely happy simply uninstall!
Using PTFB Pro to warn you of events on a shared computer

The “notification” options available for every macro, button press, window restore and program monitor item in PTFB Pro were added primarily for those wishing to keep a record of PTFB Pro’s activities but they can easily be put to other uses.

For example, let’s say your company has a PC set aside for specific tasks, like scanning, faxing and printing for example. That PC is open for all employees to use,  but you’re the techie/administrator responsible for keeping it running smoothly. When something goes wrong the regular staff have to get a message through to you to fix it, but do they know where you are? What your extension number is? Wouldn’t it be handy if the notification of the problem happened automatically? With a bit of help from PTFB Pro, it can.

Let’s say the condition you want to catch is that the printer has run out of ink/toner. The PC hosting the printer puts up a warning message when this happens, and that’s what you can use as the trigger for an email from PTFB Pro, as follows:

1) Configure PTFB Pro for sending emails. This is just a matter of filling out the details of your SMTP server (which can even be GoogleMail).

2) Create a “Single Press” item that just clicks somewhere on the warning message. It doesn’t really matter where the click occurs, because it’s the notification that you really want!

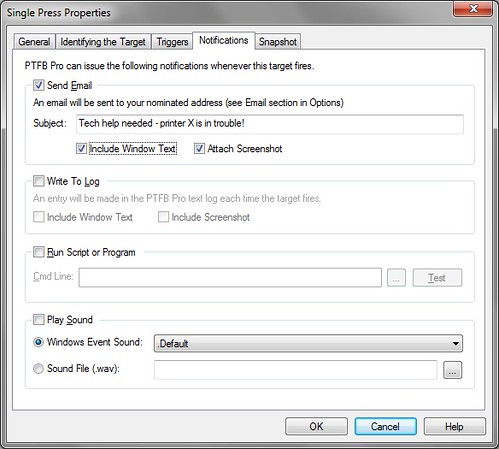
3) Double-click the new item to open it for editing, and switch to the Notifications tab. Tick the “Send Email” box, put in a meaningful title for the email, and if you like have PTFB Pro take a screenshot of the warning message itself so that you can see the problem for yourself before you’ve even left your seat.

Email Notification

Hit OK to save changes and “Start Watching” to put PTFB Pro into action, and you’re done. The next time the problem occurs, you’ll get an email with an attached screenshot of the error screen. You’ll soon be on your way to fix it, armed with accurate info on what the problem is, rather than a vague description from another member of staff.

Find out more about boosting your productivity with autoclicks and macros.
CLICK HERE to download a free 30 day trial, no strings attached. If you aren’t entirely happy simply uninstall!
Enabling macros to work even when Remote Desktop is closed or minimized

Remote Desktop is a real boon to many Windows users. It’s free, and it lets you control a PC in another location without have to leave your seat. Unfortunately, as many people have found,  strange things happen when you minimize the remote window or close it without formally disconnecting the session; the remote copy of Windows suddenly stops responding to the mouse and key presses generated by macro recorders – PTFB Pro included.

Happily PTFB Pro now includes a workaround for this. All you have to do is turn it on:

1) Open up PTFB Pro and choose Options -> Configure to bring up the configuration screen

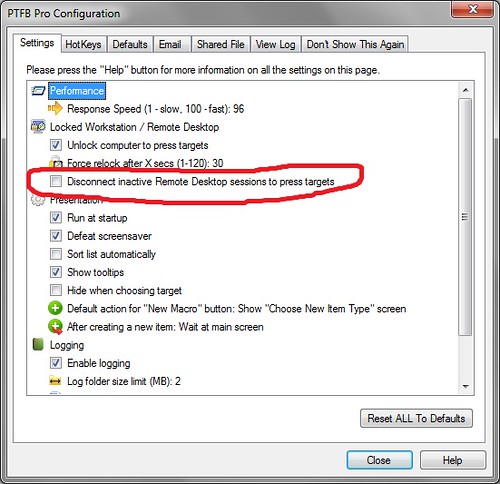
2) Tick the option marked “Disconnect inactive Remote desktop sessions”

Enable RDP workaround

3) Hit Close, and you’re done

So what does this option do?

When the option is ticked, PTFB Pro is able detect when it’s running in a remote desktop session that has become inactive – in other words, that the RDP window has either been closed or minimized. It still doesn’t take any action at this point – not until it spots something that requires its attention. This might be a macro that has to run, or a button that needs to be pressed, but whatever the cause, when PTFB Pro realizes that it has to take action, it disconnects the remote session. As soon as that happens, the remote copy of Windows stops ignoring mouse and key presses and PTFB Pro is able to carry out its work.

It’s important to note that the disconnection never happens while you’re working with the remote PC! It only happens when the connection has become inactive because you’ve either closed or minimized the remote window. Obviously if you subsequently want to check in on the remote PC you have to reconnect, but better that than discovering that an important task has been held up for a few hours because the connection went inactive!

Notes For Windows 7

Behind the scenes PTFB Pro uses the TSCON command to kick the inactive remote desktop session back to the console. Under Windows 7 the TSCON command can only run with full (elevated) privileges. Consequently PTFB Pro’s attempts to use the command will be ignored by Windows. There are two ways to get round this.

1) You can disable User Account Control (UAC). This is not recommended as it weakens Windows 7’s inbuilt security somewhat, but it does allow PTFB Pro to execute TSCON correctly and eliminates a number of Windows prompts. The choice, and the associated risks, are yours to take.

2) Alternatively, you could create a small .bat file that includes the following command line:

tscon 1 /dest:console

Create a shortcut to the .bat file and in the Compatibility page of the shortcut’s properties set the option labelled “Run this program as an administrator”. Use the shortcut to exit the remote session whenever you want PTFB Pro to be able to continue handling targets. Note however that Windows will ask you for permission for this each time.

Find out more about boosting your productivity with autoclicks and macros.
CLICK HERE to download a free 30 day trial, no strings attached. If you aren’t entirely happy simply uninstall!
Automatically resize/reposition a window

Starting with version 4, PTFB Pro supports the creation of items that automatically adjust windows to your preferred size, position and state when they appear. These items are intended primarily for programs that either don’t remember their most recent screen position, or fail to restore it correctly from one session to the next. For example, it’s not uncommon to see an older and otherwise fully functional program that doesn’t cope very well with the extra thick window borders used by Microsoft’s “Aero” interface. With a bit of help from PTFB Pro, such programs will once again occupy the correct position on screen, time after time.

For this example, I’ll use a program called Noise Ninja 2, which removes the noise (unsightly grain) from digital photographs. Noise Ninja 2 was written before the new look themes of Vista and Windows 7, and though it makes an attempt at restoring its size & position from the previous session, it doesn’t quite get it right. It cuts off the top of the window slightly when it starts up.  It’s a minor thing, but it bugs me, so I use one of PTFB Pro’s Window Restore Macros to fix it.

Here’s how:

1) Start up Noise Ninja (or the program of your choice)

2) Open up PTFB Pro’s main screen, hit New Macro and choose Window Restore

PTFB Choose Macro

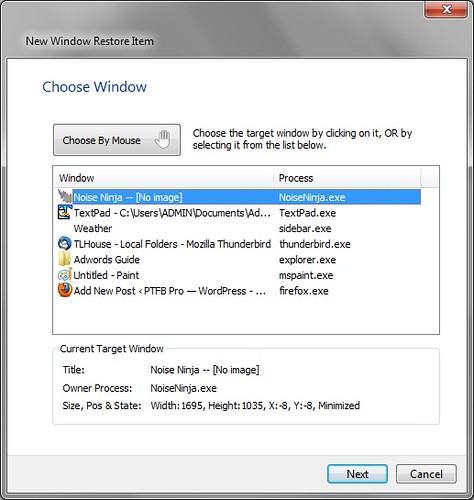
3) Select the target program’s window in the list, and hit Next

Winrestore - NoiseNinja

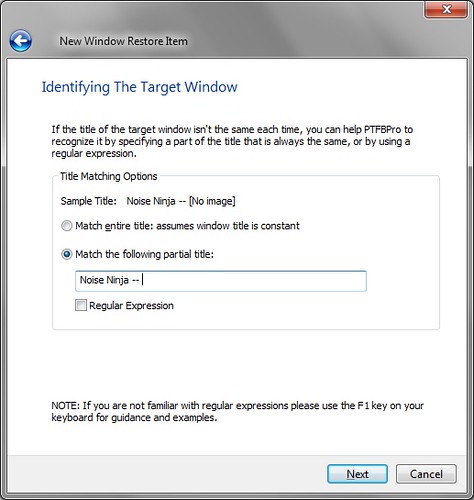
4) On the next page, I need to make a few tweaks to help PTFB Pro recognize the Noise Ninja window, because Noise Ninja includes the name of the currently open file in its title (many other programs do the same). I select the “Match the following partial title option” and cut out the name of the current document:

NoiseNinja - identifying the title

5) On the Action page, I just tick the “Maximize” option and move on

6) On the final page I just supply a more meaningful title, like “Noise Ninja – Maximize”, and hit Finish

That creates the Window Restore macro, and as soon as I hit “Start Watching” PTFB Pro fixes Noise Ninja’s window, and keeps fixing it automatically whenever I start up Noise Ninja in the future. That’s one less irritating distraction when I’m editing my photos!

Find out more about boosting your productivity with autoclicks and macros.
CLICK HERE to download a free 30 day trial, no strings attached. If you aren’t entirely happy simply uninstall!
How to automatically add tags in WordPress

When I’m writing a post in WordPress that contains photos, there are a lot of repetitive tasks. For example, just inserting a photo goes something like this:

  • copy the appropriate image URL from my Flickr page
  • switch back to WordPress’s HTML editing view my browser
  • type in all the opening formatting tags I want to use for each and every image
  • paste in the image URL
  • close all the tags

Since the clipboard can only hold one thing at a time, that adds up to a lot of repetitive typing, but I’ve cut almost all of it down to a couple of key strokes using PTFB Pro’s inbuilt macro recorder. Setting up the macro was straightforward – it boiled down to this:

  1. Record a macro that types the opening tags, uses CTRL+V to paste the contents of the clipboard, then types the closing tags and hits the return key
  2. Attach a memorable hotkey sequence to the macro to trigger it on demand.

As soon as I’d created the macro (step #1 above) I double-clicked it to make a couple of tweaks. On the Triggers page, I turned off the “Trigger spontaneously” option because I only want the macro to run when I tell it to. I then ticked the hotkey trigger, and chose the key sequence that would subsequently run the macro.

Trigger by hotkey

On this occasion I chose CTRL + SHIFT + I. Why? Well for me the “I” suggests “insert” and “image”, so it’s easy to remember, and combining it with CTRL and SHIFT together means that it’s very unlikely to clash with hotkeys used by any other software on my computer.

Now, pasting and formatting a photo in a WordPress post comes down to this:

  • copy the Flickr URL to the clipboard
  • switch to the WordPress HTML view
  • hit CTRL+SHIFT+I

That’s a lot less typing, and it frees me from having to remember the tags I want to use. I can write the post faster not only because of the time saved by typing less, but also because I can keep my concentration going on the content of the post rather than the editing process.

If I’d wanted I could have added more into the macro – for example I could have switched to the WordPress HTML view automatically. In this case I decided to keep it simple; I’ve found that unless I’m creating a throw-away macro for a huge one-off editing job it’s better to keep the macros small and clean. The same principle applies in writing software; keep each function small, self contained and free of side effects and they’re a lot easier to reuse!

Find out more about boosting your productivity with autoclicks and macros.
CLICK HERE to download a free 30 day trial, no strings attached. If you aren’t entirely happy simply uninstall!
How to automatically kill then restart a program that is “Not responding”?

One of the companies I worked for had an old but irreplaceable mail proxy program running on a dedicated PC. The program’s job was to split up incoming mails and make sure that they got to the right person’s inbox. It did a great job when it worked, but it was a buggy and every so often it would freeze/hang. Once it got into this “not responding” state the only way to get it working again was for someone to open task manager, find it in the process list, force it to quit and then restart it. This was annoying both for the people stuck waiting for their mail, and for the poor fellow who had to drop everything to fix it.

This is one of many situations where PTFB Pro’s Program Monitor or “Progmon” items can make things run a lot more smoothly. Progmons can detect when a program has entered the “not responding” state, force it to quit and relaunch it automatically without the need for any human intervention. Setting them a Progmon up is easy:

1) Open PTFB Pro’s main window

2) Click New Macro and choose ProgMon Macro.

3) Find the program in question in the process list, select it and hit Next.

4)  Choose the option “Restart the program ONLY if it’s not responding, and set how often the check should be made. In many cases the default of five minutes is good enough. Click Next when you’re done.

Progmon action page

5) Click Next again, because the defaults are fine for the “Close Program” page of the wizard. You’re now on the final wizard page where you can specify how the program should be relaunched. If there are any special command line directives you need to use, include them here and hit “Finish”.

That’s it. Hit Start Watching and PTFB Pro will keep an eye on the program, killing and restarting it automatically the next time it hangs.

Find out more about boosting your productivity with autoclicks and macros.
CLICK HERE to download a free 30 day trial, no strings attached. If you aren’t entirely happy simply uninstall!

What is jusched, and how do I stop it running all the time?

If you’ve looked at the list of running processes in Task manager, chances are you’ve seen something called “jusched.exe”. This program is set to run automatically when your machine boots, and keep running all day long. It’s installed on your system when you install the Java runtime, and it’s function is just to check for updates periodically. I’d be the first to agree that it’s important to keep things like the java runtime up to date – patches for security issues come out all the time and you don’t want to miss them but, does jusched.exe really have to run all the time, permanently confiscating a chunk of your available memory? No, I don’t think so.

A better idea would be for it to run briefly once a day when your computer starts up, then quit automatically. That way it has time to do a check for updates and prompt you about them, but it doesn’t then hang around all day like a bad smell. You can get this exact behavior with a bit of help from PTFB Pro, as follows:

1) Open up PTFB Pro’s main window, click New Macro and choose ProgMon Macro.

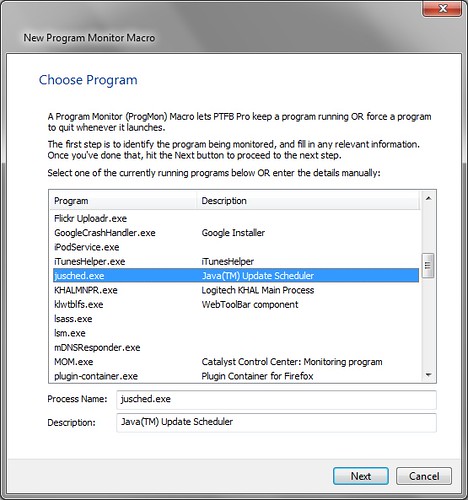
2) Find jusched in the resulting list of processes and select it

ProgMon jusched

3) On the next page, choose “Force the program to exit”, because we’re going to get PTFB Pro to quit jusched to exit once it’s done its job for the day.

ProgMon Force Exit

4) The next page lets you select how politely PTFB Pro goes about making jusched quit. Since justched runs without a window, you have to choose “Forced Exit”. Once you’ve done this, hit Finish to exit the wizard and create your progmon item.

5) Finally, double-click the progmon you’ve just created to make a couple of tweaks. Switch to the Triggers page and change the initial delay to something that gives jusched sufficient time to do it’s update check. Ten minutes sounds about right to me, but you can go shorter or longer if you prefer.

Jusched initial delay

Also, you can turn off the “Repeat” option because once jusched has quit, it won’t come back until you next boot (or logoff and log back in). Click OK once you’ve made your changes.

And that’s it. PTFB Pro will let jusched run for a little while when you first start your computer on a morning, but then it’ll silently tell it to quit, freeing up whatever resources  it was holding.

If you like, you can be even more specific about when jusched gets to run. PTFB Pro lets you set items to run only on certain days of the week, or between certain times during the day, so you can strike the balance that seems right to you.

Find out more about boosting your productivity with autoclicks and macros.
CLICK HERE to download a free 30 day trial, no strings attached. If you aren’t entirely happy simply uninstall!
How to view a Password Protected PDF without entering the password every time

Password protected PDF (Adobe Acrobat) files are often used for books, guides, training manuals and other publications that you can buy online. Once you’ve bought the document, you’re given a download link and a password. Adobe Acrobat Reader requires you to enter the password every time you want to view the document, and this can be annoying if it’s something that you refer to frequently. The last thing you need in this security-obsessed age is yet another password to remember. The easiest way to fix this is to get PTFB Pro to enter the password for you automatically.

Here’s a step-by-step breakdown of how to get PTFB Pro to enter the password for the protected PDF automatically:

1) Open the password protected PDF in Adobe Acrobat Reader. Typically this just means double-clicking the document!

2) You’ll now see Adobe Reader prompting for the password. Don’t enter the password just yet!

PDFPassword

3) Open up PTFB Pro’s main window (e.g. by clicking on its mouse icon in the system tray).

4) Click on “New Macro” and choose “Window Macro”

PTFB Choose Macro

5) Click the hand cursor on the password window to start recording, type in your password and hit OK.

That’s it – you’re done! The next time you go to open the document, PTFB Pro will enter the password for you automatically. That’s one less password for you to remember, less typing, and quicker access to the book, guide, or manual that you’ve paid for.

Find out more about boosting your productivity with autoclicks and macros.
CLICK HERE to download a free 30 day trial, no strings attached. If you aren’t entirely happy simply uninstall!