Macro Re-Record and Windows 10 Lockscreen in PTFB Pro v5.1

By popular request, the ability to re-record macros has been added to the latest release of PTFB Pro, version 5.1.0.0. The new feature is available via the “Edit…” button on the main screen, and of course on the Editing tab of each macro’s property sheet.

By default the “Re-Record” command appends any new mouse / keyboard actions to the end of the macro, along with a comment line that notes when the re-record occurred. If instead you’d simply like to replace the entire contents of the macro, just use the “Clear All Actions” command that is also present in the Edit button’s drop-down menu. Incidently if you’re a heavy keyboard user, you’ll find the new release of PTFB Pro a little be easier to drive without using the mouse.

Also notable in the new release is that it implements the automatic workaround for the stubborn lockscreen that came with the Anniversary Update for Windows 10, as detailed in my previous post. People who find the Windows 10 lockscreen irritating might want to install PTFB’s optional workstation unlock service for that reason alone; just run the installer and tick the service option – you don’t even need to turn on workstation unlocking in Options -> Configure if you don’t want to.

Finally, the new release also helps PTFB Pro’s visual trigger to cope with Windows User Account Control dialogs. Ordinarily these screens are presented on a “secure desktop” which puts them out of reach, but there’s a tweak available in the local security policy editor (secpol) that changes this (Local Policies -> Security Options -> “User Account Control: Switch to the secure desktop when prompting for elevation”). The problem is that the UAC screens all bear the same title, and don’t allow PTFB Pro to read the text they contain. However, careful use of v5’s new visual trigger gives PTFB Pro a way to tell the screens apart.

Granted, the above is something of a niche case; most people (me included) run with UAC in its normal configuration. That said, the visual trigger facility is proving to be very handy for a wide range of screens that people want to handle automatically, but which resist standard identification methods such as title and text contents. Next time you run into difficult dialog or prompt, take a moment to consider whether the visual trigger could be just what you need.

Get the latest version of PTFB Pro from our download page here: http://ptfbpro.com/download.shtml

Better handling of hotkey triggers in PTFB Pro v5.0.2.0

The latest release (v5.0.2.0) brings two small but useful improvements to PTFB Pro: better handling of hotkey triggers, and the ability to supply to text that prevents a match when looking for target windows for macros and single-press items.

The first change causes PTFB Pro to wait until the most important modifier keys (ALT, SHIFT and CTRL) are not still down before triggering a macro by hotkey. Previously the macro would trigger immediately – possibly while a modifier key was still in the “pressed” state on the keyboard. In some programs (MS Office particularly) this could cause a “sticky” key problem; by waiting for the modifier keys to come back up, the problem is eliminated. If for whatever reason you prefer the previous behavior you can bring it back: just head over to Options -> Configure and turn off “Wait for key-up on hotkey trigger”.

The second change concerns the “Identifying the Target” page of items like single-presses and window-based macros.  If you look at the top section of this page, you’ll now see an extra field titled “Exclude this text”..

This optional field – which can be a regular expression if required – specifies text which will prevent the macro firing if that text is present in the target window’s title (aka “caption”). This small addition provides a surprising amount of extra control over when a macro fires. For example, let’s say you’ve made a macro that automatically saves your work every few minutes in your favorite editing app. The problem is, the macro fires even when you’re editing a new (“Untitled”) document that hasn’t been saved yet. The solution is just to add “Untitled” to the “Exclude this text” field; now the macro makes an exception for untitled documents, but saves all your other work automatically.

This new functionality was requested recently by a new customer. If there’s something YOU would like to see added to PTFB please get in touch; I can’t guarantee that all requests will be implemented, but if it’s something that could benefit other PTFB users we’ll certainly consider it!

Running Macros and Passing Parameters via Powershell / Command Line

Last time I looked at the new trigger in PTFB Pro v5 that can react to changes in color, text, and even graphics. In this post, I’ll concentrate on new facilities that version 5 brings via the command line; they’re useful enough on their own, but they’re especially helpful if you want drive PTFB Pro from a powerful scripting engine such as Powershell.

Command Line Control of PTFB

Enable/Disable Macros or PTFB Pro as a whole

The /ENABLE or /DISABLE directives can be used to enable or disable either PTFB Pro as a whole, or a specific set of macros / press items. If your goal is to enable/disable macros, just specify the four-digit macro IDs in a space-separated list (you can get the IDs from the Triggers page for each of the items). Here are some examples:

"C:\Program Files (x86)\Technology Lighthouse\PTFB Pro\PTFBPro.exe" /ENABLE
"C:\Program Files (x86)\Technology Lighthouse\PTFB Pro\PTFBPro.exe" /DISABLE 1BF0 5C33 7EA0

The first line above (re) enables PTFB Pro, while the second disables three specific macros, so they can no longer run automatically.

Run a list of macros / presses

PTFB Pro v4 was able to launch up to two macros from the command line; in version 5 there’s no limit to the number of macros / presses that can be run, and they’ll be run in the order given. Just include the macro IDs in a space-separated list like so:

"C:\Program Files (x86)\Technology Lighthouse\PTFB Pro\PTFBPro.exe" 1AB0 83CB 2FF0

Waiting for completion

Sometimes when you’re running PTFB Pro from a script it’s handy to make the script wait until the actions you’ve requested have actually completed. That is now possible in version 5 thanks to the “/WAIT” directive. To use it, just include it as the first thing on the command line right after the path to PTFB:

"C:\Program Files (x86)\Technology Lighthouse\PTFB Pro\PTFBPro.exe" /WAIT 1AB0 83CB 2FF0

In the above example, the command will only return when the final macro (ID 2FF0) has finished executing. If you omit the “/WAIT” directive, the command will return almost immediately, likely before any of the macros have run to completion.

Parameters

Some of PTFB Pro’s macro actions now take optional named parameters, and these parameters are supplied via the command line:
"C:\Program Files (x86)\Technology Lighthouse\PTFB Pro\PTFBPro.exe" 1AB0 -param10 "3" -param2 "My Text" 83CB 2FF0

In the above example, the macro with ID 1AB0 will be executed and the values 3 and My text will be provided as parameter#10 and parameter#2 respectively to any actions in the macro that use those named parameters. The macros with IDs 83CB and 2FF0 will then be executed, but they will run without any parameter values.

So, which actions can take parameters? Currently the list includes: Run Item, Run Executable, Enable Item Temporarily, Repeat Loop, Switch To Prog and Set Clipboard. That last action – Set Clipboard – is also new to PTFB Pro version 5; it allows you to load the Windows clipboard with one of the following:

  • literal text
  • the contents of a nominated text file
  • one or more file paths (file objects)

If you’re a bit of a Powershell script addict, I’m sure you’re already realising just how useful the new parameterized control of PTFB is going to be. Even if you’re not much of a scripter now, be aware that the facilities are there for if you should need them in the future, and they’re due to be extended further in subsequent updates to v5!

PTFB’s Visual Trigger Up Close

It’s time to take a closer look at one of the major new features in PTFB Pro version 5 : Visual Triggers.

Simply put, they allow PTFB to react to a change on screen that is visible to the eye, but is otherwise not detectable. Examples include a change in color, in wording, or in a graphic.  Visual change triggers are available for single clicks / presses and for all of PTFB’s macro types, including”ProgMons” which are used to handle launching, suppression and automatic restarting of other programs on your Windows PC.

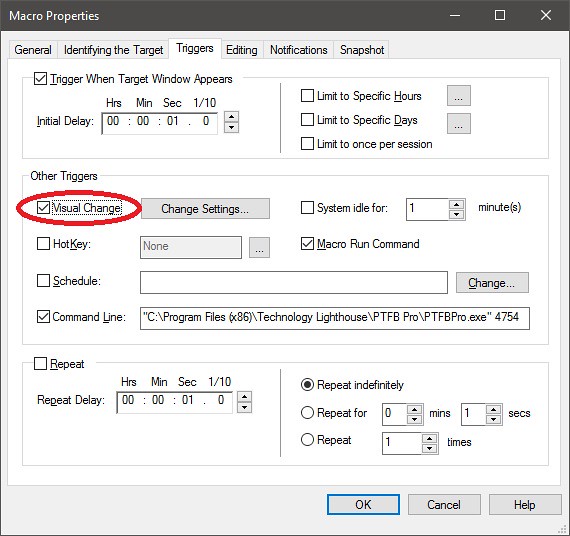
To use the new trigger type, you need to open up your macro for editing (just double-click it on PTFB Pro’s main screen) then switch to the Triggers tab. The option you’re looking for is the checkbox labelled “Visual Change” in the top left of the “Other Triggers” section:

Visual Change - Triggers Page

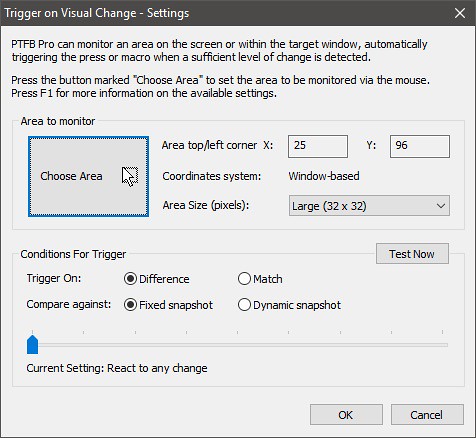
Tick this new trigger type or press the “Change Settings…” button next to it to open up a new screen where you can set the specifics: what part of the screen you want to monitor, and what kind of changes will be enough to cause your macro to run. Let’s take a look at that settings dialog now:

Trigger on Visual Change - Settings

The first section of this dialog defines which part of the screen should be monitored for changes; you do this by press the button marked “Choose Area”. Your mouse cursor will change to a little grey-bordered box; simply move that box over the target area and click the left mouse button to select it (or click the right mouse button / press the “Esc” key to abort). For performance reasons the largest area you can monitor is a 32 x 32 pixel square; you can narrow this to a smaller area (16 x 16 or 8 x 8) at any point if you wish. PTFB Pro will indicate whether the area you’ve chosen is a part of the screen as a whole, or a part of your target window if you’re editing a single-press item or window-based macro. At the instant you click to set the area, PTFB Pro takes a snapshot of the region as it is right now. You get to choose if and how this snapshot will be used in the section titled “Conditions For Trigger”.

The first choice in the Conditions section is whether to react to a difference or a match; the “Match” case is useful when the monitored area changes routinely but you only want the press or macro to run when it’s a reasonable match to the snapshot you just recorded.

Next – if you’ve chosen to trigger on “Difference” – you can choose whether comparisons will be made against the fixed snapshot you made earlier, or against a so-called “Dynamic” snapshot. If you want PTFB Pro to react each and every time the monitored area changes then you should choose “Dynamic”, otherwise just go for the “Fixed snapshot” option.

Finally there’s a slider that lets you fine-tune the sensitivity of the visual trigger. The effect of this depends on whether you previously chose to trigger on a “Difference” or a “Match”. When looking for a difference, the left hand side of the slider represents maximum sensitivity; PTFB Pro will run the macro in response to any detectable change. As you move the slider to the right, PTFB Pro requires a more substantial change before the macro runs. The slider effect for “Match” works the other way around; the left hand side requires an almost exact match with the snapshot, but as you move it to the right, an increasingly less perfect match will be enough to trigger your macro.

I should take a moment here to note the link between the effect of the slider control and the area size that you choose. A small change in the largest (32 x 32 pixel) area size might only rack up a difference value of say 8%. However, if you drop that to the smallest area size (8 x 8) then that same small change becomes more significant. Remember that phrase “small fish in a big pond” : the same principal applies here.

To make it easy to tune all these settings and ensure that you’ll get the effect you want, the Visual Change Settings screen has a button marked “Test Now”. Press it, and PTFB Pro will tell you exactly how much of a change it sees, and whether it would be enough to trigger your macro.


So that’s the lowdown on the new Visual Change trigger-type in PTFB Pro; the next post will focus on some of the other new features in version 5. Don’t forget you can try PTFB Pro right now by downloading the free 30-day trial.


Bypassing the Windows 10 lock screen to press buttons automatically

For some time now PTFB Pro has had a special setting in Options -> Configure called “Unlock computer to press targets”. When enabled, its purpose is to briefly bypass the locked workstation screen on Windows to deal with any buttons that have to be pressed (or macros that have to be run) on the desktop. As soon as any necessary work is done, the workstation is automatically re-locked, and under normal circumstances this happens much faster than a human could react.  For those who needed it, this option worked beautifully on all versions of Windows.. until Windows 10 came along, with its new lock screen.

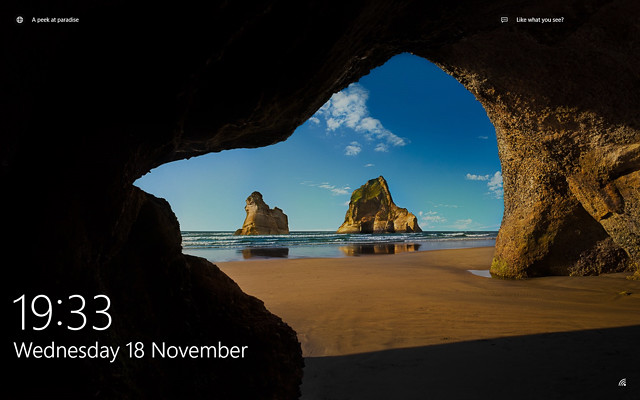
lockscreen

Well, after finally taking the plunge and installing Windows 10 TH2 on my main development system, I’m happy to report that I’ve found a way to get the “Unlock computer to press targets” option to work even on the new OS. All you have to do is make a small registry edit to disable the new Windows 10 lock screen, as described below. To be honest, if you’re like me then you’ll probably want to do this anyway just because the lock screen places an extra mouse press between you and logging back in to your desktop.

Here’s what to do, but before you go ahead, here’s a warning: don’t do this unless you’re experienced at registry editing! The Windows registry is critical to the operation of your computer and if you make a mess in there, you’ll likely have to restore or reinstall your operating system to fix it. Still want to go ahead? OK, here’s the step-by-step:

  • Open regedit
  • Navigate to: HKEY_LOCAL_MACHINE\SOFTWARE\Policies\Microsoft\Windows
  • Look for a subkey entitled “Personalization”. If it’s there, enter it, otherwise create it. And then enter it.
  • Add a new DWORD (32-bit) value called “NoLockScreen” and set its value to 1

That’s it, you can close Regedit now because you’re done. This change takes immediate effect; you can test it straight away by tapping Windows key + L. If you go direct to the login screen, you’ve done it right. After this, PTFB’s “Unlock computer to press targets” will work just fine (so long as you’ve enabled it and also chose the option to include the PTFB Pro workstation service when you last installed PTFB).

If you need a more involved step-by-step procedure than the above for turning off the new Windows 10 lock screen,  then you probably shouldn’t be messing around with Regedit in the first place (just kidding, well, maybe). Nevertheless you’ll find a really excellent walk through here, complete with screenshots:
http://www.laptopmag.com/articles/disable-lock-screen-windows-10