How to automatically login to applications when they start up

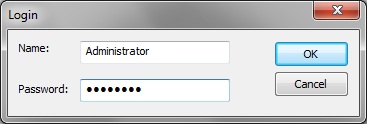
Let’s say you have a program that requires a login each time you use it – maybe a database or source control application. If the security angle isn’t an issue (maybe everyone in the office knows the password, or maybe you’re the sole user), why not let PTFB Pro handle the login for you?

How to do it …

Next time an irritating dialog or confirmation screen appears :

  1. Open up PTFB Pro’s main window by clicking on its tray icon
  2. Click on “New Macro…” and choose “Window Macro ”
  3. Click the hand-shaped cursor on the login window and proceed with the login just as you would normally.
  4. That’s all there is to it!
    As soon as you’ve entered your name and password into the login screen and hit OK, macro recording will end automatically. Your new macro is ready to perform the login for you automatically from now on!To put PTFB Pro to work, click “Start Watching”, or press the close box in the top-right corner. PTFB Pro will minimize to the system tray and keep watch for offending windows and dialogs. When they appear it will handle them for you.You may wish to tweak your new macro’s settings after you’ve created it. For example, you might want to lower the initial trigger delay from the default value of 1 second to zero, so that the macro fires instantly whenever the login window appears.

Find out more about boosting your productivity with autoclicks and macros.
CLICK HERE to download a free 30 day trial, no strings attached. If you aren’t entirely happy simply uninstall!

The Role of “Skip Redundant Mouse Movement” In Macro Playback

If you take a look at any screen or window-based macro you’ve recorded in PTFB Pro, you’ll see a checkbox marked “skip redundant mouse movement” on the first page of its property sheet.

So what does it do? Why is it so important in macro playback?

Basically, any time you record a macro all mouse movements are preserved in that recording. When you drag your mouse from one side of the screen to the other, you aren’t just going directly from A to B, you’re taking your mouse cursor on a journey with hundreds, maybe thousands of little “course corrections” along the way.

Now if you’re recording a macro to duplicate a drawing operation for example, all those little mouse movements are important and you want to keep them. On the other hand, if you’re just carrying out a regular computing task, like moving the mouse over a button and clicking, those mouse movements are pretty much irrelevant; all that matters is that the mouse is in the right place when the click occurs. What’s more, if you want your macro to play back at maximum speed, you’re better off ditching all those redundant mouse movements entirely. That’s exactly what “Skip redundant mouse movement” does; when the macro plays with the skip option enabled, it’s as though all the unimportant changes in mouse position aren’t there. The result? More efficient  playback that consumes less computer horsepower (cpu utilization).

The real beauty of this option is that it doesn’t actually delete the excess mouse movements from the macro, never to be seen again; instead it simply skips over them. So, anytime you want the macro to play back exactly as it was recorded, you just untick the button and move the playback speed to the middle position.

Find out more about boosting your productivity with autoclicks and macros.
CLICK HERE to download a free 30 day trial, no strings attached. If you aren’t entirely happy simply uninstall!

Access common windows functions by hotkey

I bet there are some Windows operations you perform regularly like flushing Internet Explorer’s cache, visiting the Add/Remove programs screen (aka “Programs & Features” in Windows 7), changing folder options, tweaking the firewall’s whitelist etc. Using PTFB Pro’s macro recorder you can get access to some of these functions a whole lot faster than you might think.

Here’s an example. Let’s say you want to flush IE’s cache of temporary files:

  1. Create a screen based macro in PTFB Pro, and quit recording immediately by hitting the Pause/Break key.  That’s right – you’re not going to simply record the action of going to the Start Menu, selecting Internet Options in the control panel and digging through IE’s screens. There’s a faster way!
  2. Open the macro you’ve just created. Give it a meaningful name on the first page, then switch to the Triggers page. Turn off “Trigger spontaneously” and click on “Hotkey”. Choose the hotkey combo you want to use for this action, and switch to the Editing page.
  3. On the Editing page, delete any existing actions and add a “Run Executable” item. Type (or copy paste) the following line into the command line box: RunDll32.exe InetCpl.cpl,ClearMyTracksByProcess 8
  4. Click OK to save your changes and you’re done!

You can use the same technique for a lot of other operations, just by changing the command line you use in step #3. Below there’s a list of the more common ones on Windows 7, but a bit of Googling will no doubt find you more. Also, bear in mind that this can be just the starting point for much more powerful actions.  For example, you could define a macro that uses a RunDLL command to bring up a screen, then create another macro to carry out a specific operation on that screen, then create a third “wrapper” macro that runs both the other two in sequence in response to an entirely different hotkey.

Some more RunDLL command lines for Windows 7

Content Advisor
RunDll32.exe msrating.dll,RatingSetupUI

Control Panel
RunDll32.exe shell32.dll,Control_RunDLL

Date and Time Properties
RunDll32.exe shell32.dll,Control_RunDLL timedate.cpl

Display Settings
RunDll32.exe shell32.dll,Control_RunDLL desk.cpl

Device Manager
RunDll32.exe devmgr.dll DeviceManager_Execute

Folder Options – General
RunDll32.exe shell32.dll,Options_RunDLL 0

Folder Options – Search
RunDll32.exe shell32.dll,Options_RunDLL 2

Folder Options – View
RunDll32.exe shell32.dll,Options_RunDLL 7

Forgotten Password Wizard
RunDll32.exe keymgr.dll,PRShowSaveWizardExW

Flush IE’s Temporary Internet Files:
RunDll32.exe InetCpl.cpl,ClearMyTracksByProcess 8

Flush IE’s Cookies:
RunDll32.exe InetCpl.cpl,ClearMyTracksByProcess 2

Flush IE’s Browsing History:
RunDll32.exe InetCpl.cpl,ClearMyTracksByProcess 1

Flush IE’s Stored Form Data:
RunDll32.exe InetCpl.cpl,ClearMyTracksByProcess 16

Flush IE’s Stored Passwords:
RunDll32.exe InetCpl.cpl,ClearMyTracksByProcess 32

Full IE browsing cleanup:
RunDll32.exe InetCpl.cpl,ClearMyTracksByProcess 255

Full IE browsing cleanupfiles inc settings stored by Add-ons:
RunDll32.exe InetCpl.cpl,ClearMyTracksByProcess 4351

Hibernate
RunDll32.exe powrprof.dll,SetSuspendState

IE Favourites
Rundll32.exe shdocvw.dll,DoOrganizeFavDlg

Keyboard Properties
RunDll32.exe shell32.dll,Control_RunDLL main.cpl @1

Lock Screen
RunDll32.exe user32.dll,LockWorkStation

Mouse Button – Swap left button to function as right
Rundll32 User32.dll,SwapMouseButton

Mouse Properties Dialog Box
Rundll32 Shell32.dll,Control_RunDLL main.cpl @0,0

Map Network Drive Wizard
Rundll32 Shell32.dll,SHHelpShortcuts_RunDLL Connect

Network Connections
RunDll32.exe shell32.dll,Control_RunDLL ncpa.cpl

Open With Dialog Box
Rundll32 Shell32.dll,OpenAs_RunDLL Any_File-name.ext

Power Options
RunDll32.exe Shell32.dll,Control_RunDLL powercfg.cpl

Printer Management Folder
Rundll32 Shell32.dll,SHHelpShortcuts_RunDLL PrintersFolder

Programs & Features, aka Add/Remove programs
RunDll32.exe shell32.dll,Control_RunDLL appwiz.cpl,,0

Region and Language Options
Rundll32 Shell32.dll,Control_RunDLL Intl.cpl,,0

Safely Remove Hardware Dialog Box
Rundll32 Shell32.dll,Control_RunDLL HotPlug.dll

Sound Properties Dialog Box
Rundll32 Shell32.dll,Control_RunDLL Mmsys.cpl,,0

Stored Usernames and Passwords
RunDll32.exe keymgr.dll,KRShowKeyMgr

System Properties – Advanced
RunDll32.exe shell32.dll,Control_RunDLL sysdm.cpl

System Properties – Advanced
Rundll32 Shell32.dll,Control_RunDLL Sysdm.cpl,,3

Taskbar Properties
RunDll32.exe shell32.dll,Options_RunDLL 1

User Accounts
RunDll32.exe shell32.dll,Control_RunDLL nusrmgr.cpl

Unplug/Eject Hardware
RunDll32.exe shell32.dll,Control_RunDLL hotplug.dll

Windows Security Center
RunDll32.exe shell32.dll,Control_RunDLL wscui.cpl

Windows – About
RunDll32.exe SHELL32.DLL,ShellAboutW

Windows Firewall Options
RunDll32.exe shell32.dll,Control_RunDLL firewall.cpl

Windows Fonts Folder
Rundll32 Shell32.dll,SHHelpShortcuts_RunDLL FontsFolder

Find out more about boosting your productivity with autoclicks and macros.
CLICK HERE to download a free 30 day trial, no strings attached. If you aren’t entirely happy simply uninstall!
How to mute the sound in Windows by hotkey

Many modern keyboards have a special key for muting/unmuting the sound in Windows, but if yours doesn’t, you can create the next best thing with a PTFB Pro macro and a couple of lines of script. Here’s how to go about it.

Stage 1 – create mute/unmute script

The first stage is to create a little “.vbs” script that will toggle the sound on/off. Just open up Notepad (or your favorite text editor) and paste in the following two lines of text:

Set oShell = CreateObject("WScript.Shell")
oShell.SendKeys(chr(&hAD))

Save the file somewhere convenient, with the .vbs extension. For example, I called mine “Mute.vbs” and popped it in my documents folder. Double-click it a couple of times just to make sure it works and you haven’t made a typo anywhere.

Stage 2 – create PTFB Pro macro and bind to hotkey

OK, now we’ve got our script, we’re going to create a PTFB Pro macro to run it, and bind that macro to a hotkey.

  1. Create a new screen based macro and stop recording immediately by hitting the Pause/Break key.
  2. Open the new macro for editing. On the General page, give it a meaningful name (e.g. “Mute”).
  3. Switch to the Triggers page and turn off “Trigger spontaneously”. Now tick “Hotkey” and choose a memorable hotkey combination for the mute function. CTRL + SHIFT + M sounded good to me.
  4. Switch to the Editing page. Clear out any existing recorded actions and add just a single “Run Executable” item. For the command line, type in “cscript” followed by a space, followed by the full path to the vbs file you created earlier. If the path contgains spaces, remember to surround it with double quotes.

MuteCmdLine

That’s it. Your chosen hotkey will now execute the vbs file, toggling Windows audio between its muted and unmuted states.

Find out more about boosting your productivity with autoclicks and macros.
CLICK HERE to download a free 30 day trial, no strings attached. If you aren’t entirely happy simply uninstall!
How to stop the Windows Update Restart Nags using PTFB Pro’s autoclicker

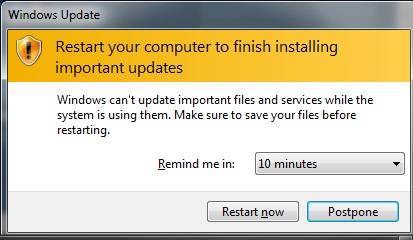
Generally speaking Windows Update is a good thing, but on Vista and Windows 7 there is one aspect of it that can be exceedingly annoying, and that is the Windows Update Restart dialog:

The accursed Windows Update Restart Prompt

How is it that this damned thing always, and I mean always, pops up when you’re in the middle of work that requires your undivided attention? Yes, you can postpone it, but just like the Terminator it’ll be back again, and again, gleefully interrupting you each time.

Some sites advise dealing with this irritating popup by stopping the Windows Update service. This is complete overkill, and probably a bad idea for a whole host of reasons. PTFB Pro gives you a far more elegant way to keep this well intentioned nuisance under control:

  1. Open up PTFB Pro’s main window.
  2. Hit “Single Press”, then click the mouse anywhere on the Postpone button in the Windows Update Restart prompt. This creates a new single press or “autoclicker” item. Note that you could use the macro recorder for the restart nag, but that’s overkill because we only need PTFB Pro to hit the Postpone button automatically.
  3. Make sure the new item has an appropriate initial delay. In my case, I set the delay right down to zero. I have a particular dislike for the restart nag and would rather not see it at all if I don’t have to.
  4. Hit Start Watching on PTFB Pro’s main screen, and you’re done!

Now PTFB Pro will keep postponing the restart for you automatically. It’ll happen so fast you’ll scarcely see the prompt screen and you’ll be able complete your work in peace, restarting only at a time that is convenient to you. What’s more, all this has been done without interfering with the Windows Update service in the slightest.

Find out more about boosting your productivity with autoclicks and macros.
CLICK HERE to download a free 30 day trial, no strings attached. If you aren’t entirely happy simply uninstall!

How to recover an off-screen window with PTFB’s Window Restore Macro

If you’ve got a multi-monitor system you might find that some programs do the job of saving and restoring their own window positions almost too well. Disconnect your second monitor and you might suddenly find that your favorite program is marooned off-screen, with no obvious way of getting it back on to your main monitor. Fortunately PTFB Pro’s Window Restore macro can help in these situations:

  1. Create a new Window Restore item
  2. On the first page of the resulting Wizard, select the errant window in the list and hit Next
  3. In most cases you can probably skip past the title matching options by hitting Next again
  4. Now you’re on the Actions page, and this is where you get to force the window back on screen! Tick “Restore Position” and set both the X & Y coords to zero. Optionally you can also resize the window and/or set it to be maximized on your main monitor. Click Next when you’re done, and Finish on the final page.

Now all you have to do is hit Start Watching and suddenly your missing window will forced back on screen. If you’re confident that the program in question has now stored its new position, you can disable or even delete the Window Restore item you just created. Job done!

Find out more about automating your workflow with Macros.
CLICK HERE to download a free 30 day trial, no strings attached. If you aren’t entirely happy simply uninstall!
Speeding up macro creation in PTFB Pro 4

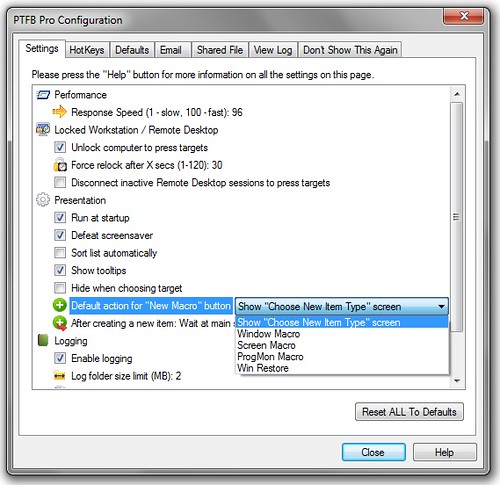
In PTFB Pro 4’s default configuration, creating a macro is a two-step process. You press “New Macro” then select the macro type from the resulting screen, or press the right hand side of the New Macro button then choose from the resulting popup menu.

If you typically create a particular kind of macro, you can speed up the process via the “Configure…” screen as follows:

New Macro Button Action

  1. Use Options -> Configure to bring up the Configuration screen.
  2. In the “Presentation” screen, locate the entry marked “Default action for New Macro button”. There’s a drop-down list next to it – choose the option you use most from the list.
  3. Hit Close to save changes.

Now the “New Macro” button is dedicated to creating the macro type that you chose, e.g. Window Restore as in the following screenshot:

New Macro Action Winrestore

Note that you can still create other macro types by clicking on the drop-down part of the button (right hand side) and choosing from the resulting menu.

Find out more about automating your workflow with Macros.
CLICK HERE to download a free 30 day trial, no strings attached. If you aren’t entirely happy simply uninstall!
How to automate external editing in Adobe Lightroom

Neither Lightroom 2 nor version 3 directly support the use of plug-ins and filters in the way that Photoshop does. They do however support the use of “external” editor programs, and this has given plug-in providers a way to get their products working with Lightroom. Take Topaz Labs for example – they have an impressive range of plug-ins, including the almost miraculous “Denoise”, all of which  can be hooked up to Lightroom using a special “go-between” program they call tlfusionexpress. While this is all good news, the actual editing process is clunky, and it’s largely LR’s fault.

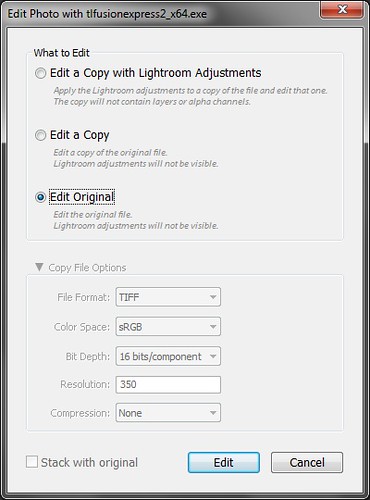
First you must hook the external editing program up to Lightroom via the External editing tab in the Preferences screen. This is a one-off operation so that’s OK, but thereafter every single time you start an edit via Photo -> Edit In, you get the following screen:

Lightroom external edit prompt

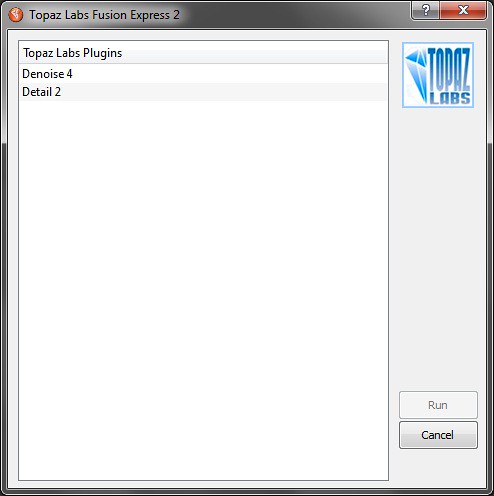
There’s no way to save your preferences and bypass this screen in future. That’s OK if you’re only using the external editor for the odd photo, but if you’re wanting to use it on a batch of 30 for example, it quickly becomes annoying. That’s not the end of it though, because there’s likely another screen coming up asking you which plug-in you want to use. Here’s the Topaz Labs version:

Topaz choose plugin

You have to do this every single time you edit a photo, and again there’s no way to indicate an automatic preference.

Lightroom is all about speeding up the post processing workflow, but these interruptions really slow you down and break your train of thought. The good news is that prompts like these are exactly what PTFB Pro was originally created for though, and it’s easy to eliminate them from the external editing process.

To deal with the first screen, pull up PTFB Pro’s main window, hit New macro and choose “New Window Macro”. Click on the Lightroom prompt to begin recording, and do exactly what you’d do in a normal edit session, i.e. choose the editing option you want and press “Edit”. At this point macro recording stops automatically and the macro is created and ready for use. You’ll never have to deal with that screen again.

Now we’re on to the next screen,  from Topaz Labs in our example. Again create a new Window Macro in PTFB Pro, choose the plug-in you want and hit “Run”. Now you’re never going to have to deal with that prompt again either.

If you want editing to proceed at maximum speed, you can edit the two macros you’ve just created and set their initial delays down to zero. On most PCs, the handling of the above two prompts will now happen so fast you’ll barely see them.

It doesn’t stop there though! You can go further with PTFB Pro if you want. For example, you could create one big macro that automatically initiates an external edit, deals with the above two prompts, and carries out the actual editing tasks you need. Tie it to a hotkey of your choosing, and you’ve collapsed a substantial amount of waiting, reading and clicking into a couple of short keystrokes.

Alternatively, you could build a macro that runs through a given number of repetitive editing tasks automatically without you even having to be at your computer. When I had a batch of over 40 photos that needed the Topaz Denoise treatment to look their best, I spent a couple of minutes creating a macro to apply the plug-in then advance to the next photo, and set it to run the required number of times. I then took the dogs for a relaxing walk, and when I came back the job was done!

Find out more about automating your workflow with Macros.
CLICK HERE to download a free 30 day trial, no strings attached. If you aren’t entirely happy simply uninstall!

Windows Automated Tray Icon Hiding and PTFB Pro

About the System Tray Icon

PTFB Pro places a mouse-shaped icon in your system tray when it is running. This icon has a small “x” when PTFB is disabled, and its color changes from blue to red (see below) when a macro is playing or when an automated action is about to run.


Normal, disabled and playback/countdown versions of PTFB Pro’s tray icon.

Clicking on the icon with the left mouse button opens up PTFB Pro’s main window. Right-clicking on the icon brings up a small menu of handy operations.

Windows Automated Tray Icon Hiding

Starting with Windows XP, Microsoft included a feature that hides tray icons to reduce clutter. This feature is particularly aggressive in Windows 7, where a new tray icon is displayed for less than a minute before it is hidden, never to be seen again unless you explicitly tell Windows not to hide it. It’s easy to check whether Windows has hidden PTFB Pro’s icon – just click on the little arrow near the right edge of your taskbar. If you see PTFB Pro’s mouse-like icon in the resulting popup window then yep, Windows has hidden it.

There are different ways to tell Windows not to hide PTFB Pro’s icon depending on the version of operating system you’re running.

Windows 7

There are actually several ways to make sure PTFB Pro’s icon is shown under Windows 7, but the easiest is:

1. Click on the “Show Hidden Icons” arrow on the taskbar
2. Click and drag PTFB Pro’s icon out of the resulting popup window and into the notification area of your taskbar.

Vista

1. Right click in the task bar and choose Properties.
2. Switch to the Notification Area tab
3. Click “Customize…”
4. Find PTFB Pro’s icon in the list, set its behavior to “Show” and hit the OK button.

Find out more about automating your workflow with Macros.
CLICK HERE to download a free 30 day trial, no strings attached. If you aren’t entirely happy simply uninstall!

How to Supress the Outlook Warning : “A program is trying to access”

When virus writers & spammers realized that they could make use of Outlook’s built-in macro language (VBA) to perform mass-mailings, Microsoft responded by issuing a security patch that has been in Office ever since. The patch intercepts external attempts to use MAPI to send emails, and forces the user to approve the outgoing emails by issuing the following prompt:

“A program is trying to access e-mail addresses you have stored in Outlook. Do you want to allow this?”

This is a commendable security feature, but it’s terribly annoying if you run software (or a script) that legitimately sends email via MAPI.  Perhaps the most frustrating thing about it is that you’re forced to wait for 5 seconds before you can signal your approval; in other words it’s guaranteed to interrupt your work flow and have you gnashing your teeth. It’s deliberately user-unfriendly!

Happily PTFB Pro can handle this annoyance for you, and it’s very easy to set up:

1. Open up PTFB Pro’s main window

2. Click on “Single Press” (you MUST use single press for this rather than a macro)

3. Move the cursor over the appropriate button on the Outlook security prompt and click the mouse

4. Go back to PTFB Pro and hit “Start Watching” to put PTFB Pro into action.

That’s all there is to it. From now on PTFB Pro will automatically respond to the Outlook security prompt for you, and the best thing is PTFB Pro doesn’t have to wait 5 seconds – it’ll do it instantly if you want (just reduce the default initial delay from 1 sec to zero). You can safely leave your PC chugging through your script and go have a coffee, and PTFB Pro will keep things running smoothly in your absence.

On a final note, please bear in mind that Microsoft added this security feature to Outlook with the best of intentions. PTFB Pro can’t discriminate between legitimate attempts to send email and the work of rogue scripts and viruses – if you use PTFB Pro to override the warning dialogs, you assume the associated risks.

Find out more about automating your workflow with Macros.
CLICK HERE to download a free 30 day trial, no strings attached. If you aren’t entirely happy simply uninstall!